This admin procedure will provide background information on utilizing the Incidents section to view possible malicious events that have been captured by O365 Defender.
This article is intended for employees of organizations that use Sittadel's security. Additionally, there are some actions that can only be accomplished by those with administrative privileges.
Defender Incidents
Where there are security controls in place, there will be alerts. Unlike many tools which focus on mass alerting sent to admin emails or reporting consoles, Defender incidents are focused solely on items that require your attention. Using its machine learning and event aggregation, it correlates multiple indicators of into one alert, giving you a fuller picture and requiring less cross-referencing of alert consoles.
This guide will accomplish the following:
- Viewing an Incident
- Responding to Malware Incidents
- Responding to Other Incidents
- Resolving an Incident
Applicable Scope: Administrators
Required Group Membership: Admin.DeviceSecurity
Viewing an Incident
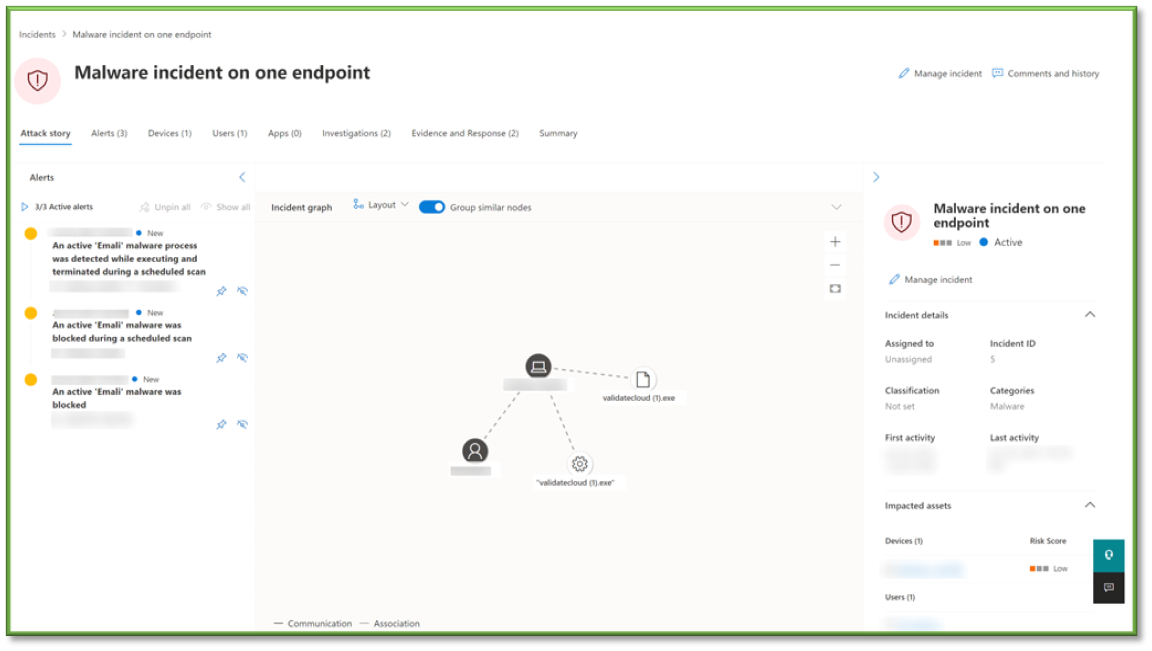
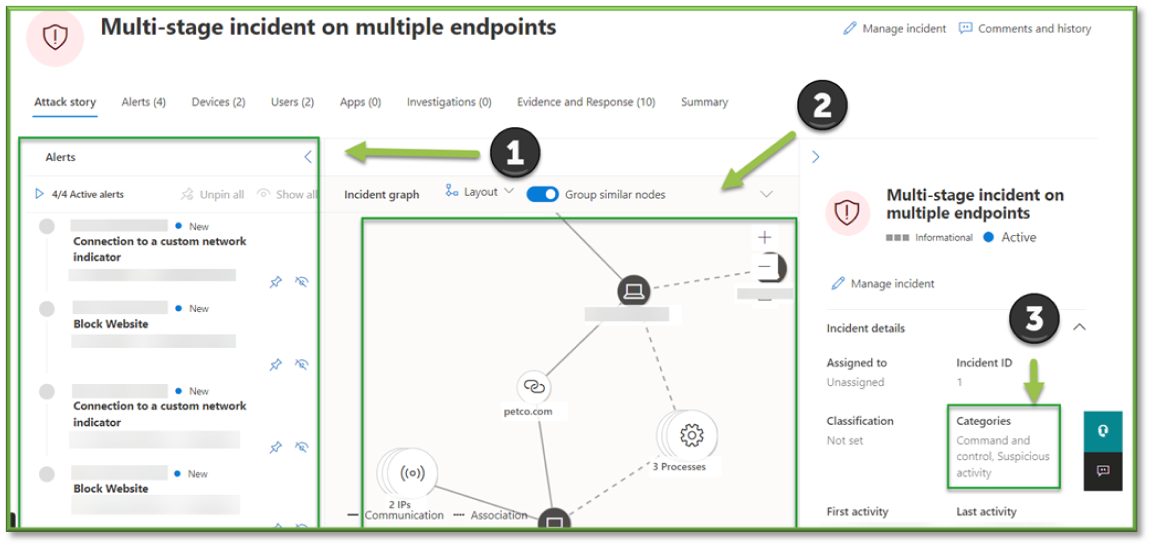
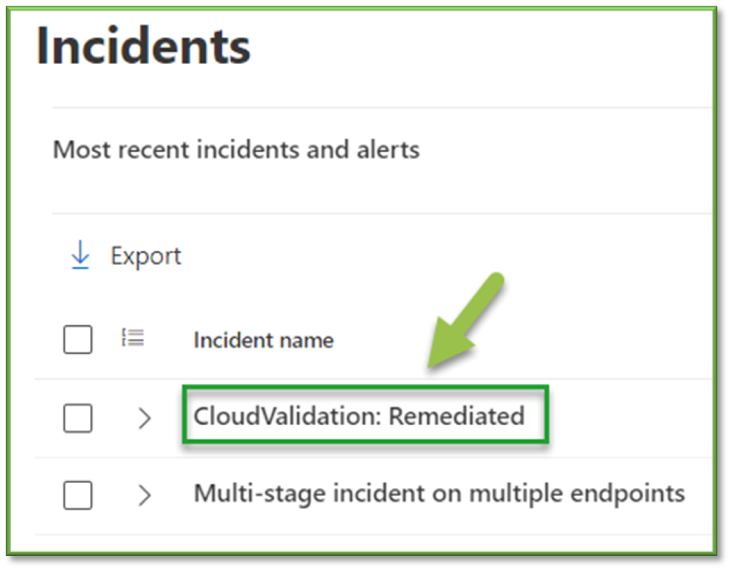
- Navigate to Incidents – O365 Defender, any incidents that are categorized as New or In Progress will be displayed. The goal should be to close out incidents as they come in, which will be covered in the following section. Click into an incident to view its details.

- Once inside the incident, the details about what happened will be displayed. Different incidents will require different types of responses; if there is a Malware keyword in the title, move on to the Responding to Malware Incidents section. If the incident does not appear to be based on malware, move on to the Responding to Other Incidents section.
Responding to Malware Incidents
- Having opened an incident, details will be shown such as the affected device, user, and rundown of what happened. While the chosen response to threats can vary widely from team to team, the following response should serve as an adequate starting point. It is by no means a completely thorough investigation and response, and if it is suspected that the endpoint may be at serious risk, involving a team of trained incident response personnel such as those offered with the Sittadel MDR service may be the right choice.
- Start to gather key information about the who and what of the incident. Starting with who, find out the user and device that has been affected by locating the Devices and Users Take note of these, as they may provide vital context when making the determination of if the incident is malicious or not.

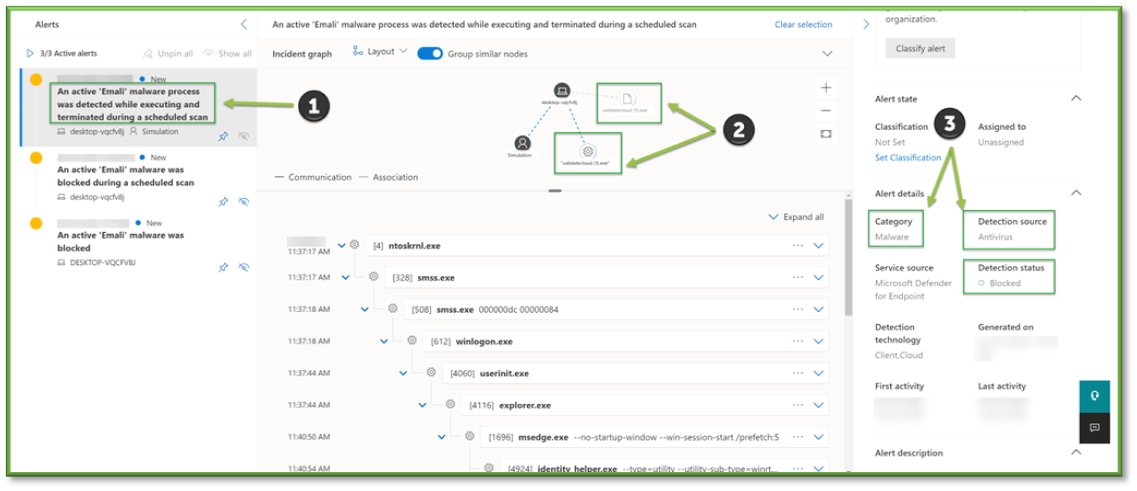
- Next, we need to find out what happened. To the left of the screen, find the Alerts that have been fired to determine if this is an email threat, endpoint threat, or other. Using the Incident Graph on the center screen, view the filenames and types that look to have executed if applicable. Finally, check the Category of alert, followed by the Detection Source and Detection Status. The detection source will indicate how it was detected, whether on the endpoint or through an email filter, along with what action was taken against the detection.
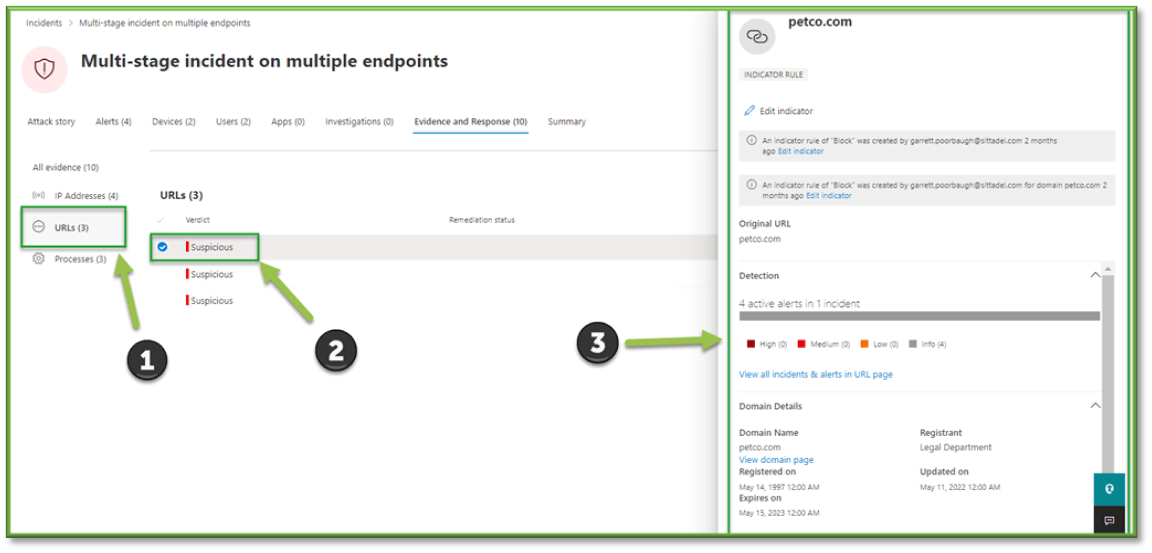
- Move to the Evidence and Response tab. Within the tab, multiple evidence types may be present. These may be IP Addresses, URLs, Processes, Files, etc. Since this section is focused on a malware detection, we will click into the Files evidence.
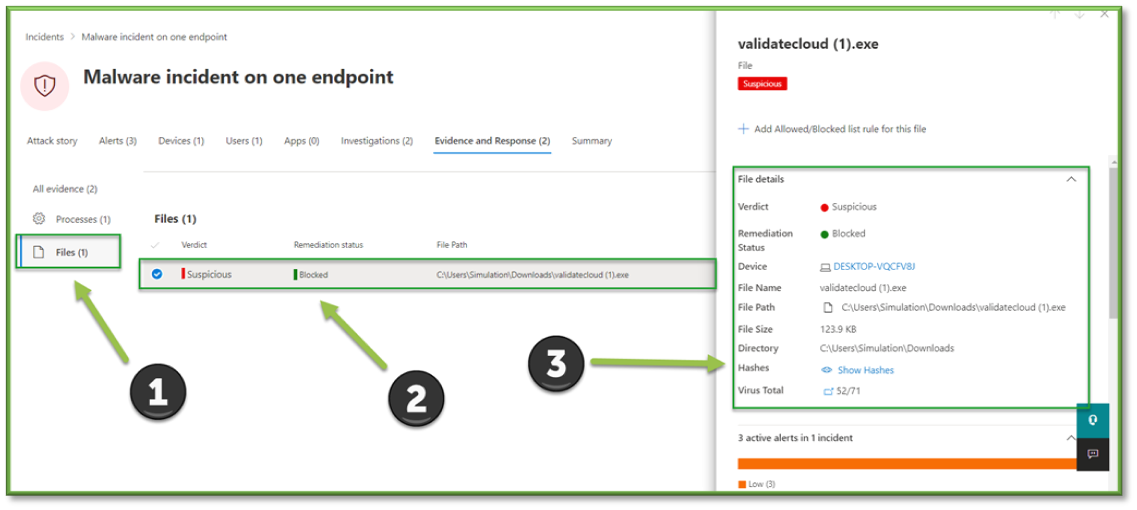
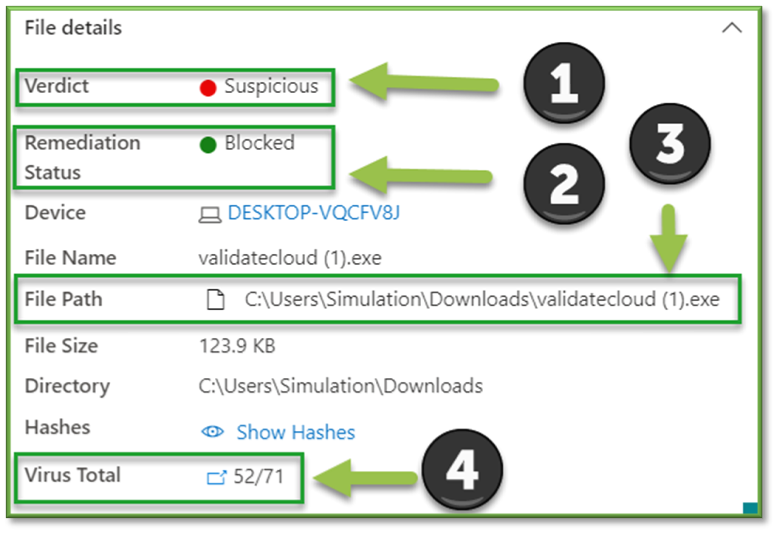
- Within the item, there will be information about the threat. The metrics of importance regarding files are as follows:
- Verdict: Microsoft’s opinion on if the file is a benign or malicious. This rating is taken by pulling together points from their threat database and observations in similar environments.
- Remediation Status: Shows what was done automatically to contain the threat.
- File Path: Gives a thread to pull on to help manual response if needed.
- Virus Total: Indicates if this has been detected as a threat before using public threat intelligence provided by Virus Total. A score of 0 would indicate it has not been detected as malicious before, but a score of 1 or above indicated confidence it is indeed a threat.
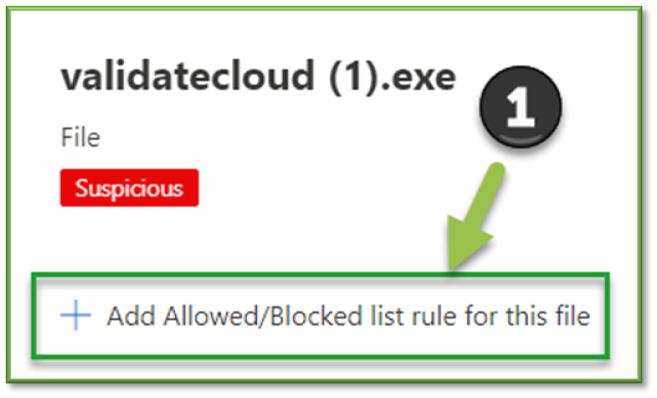
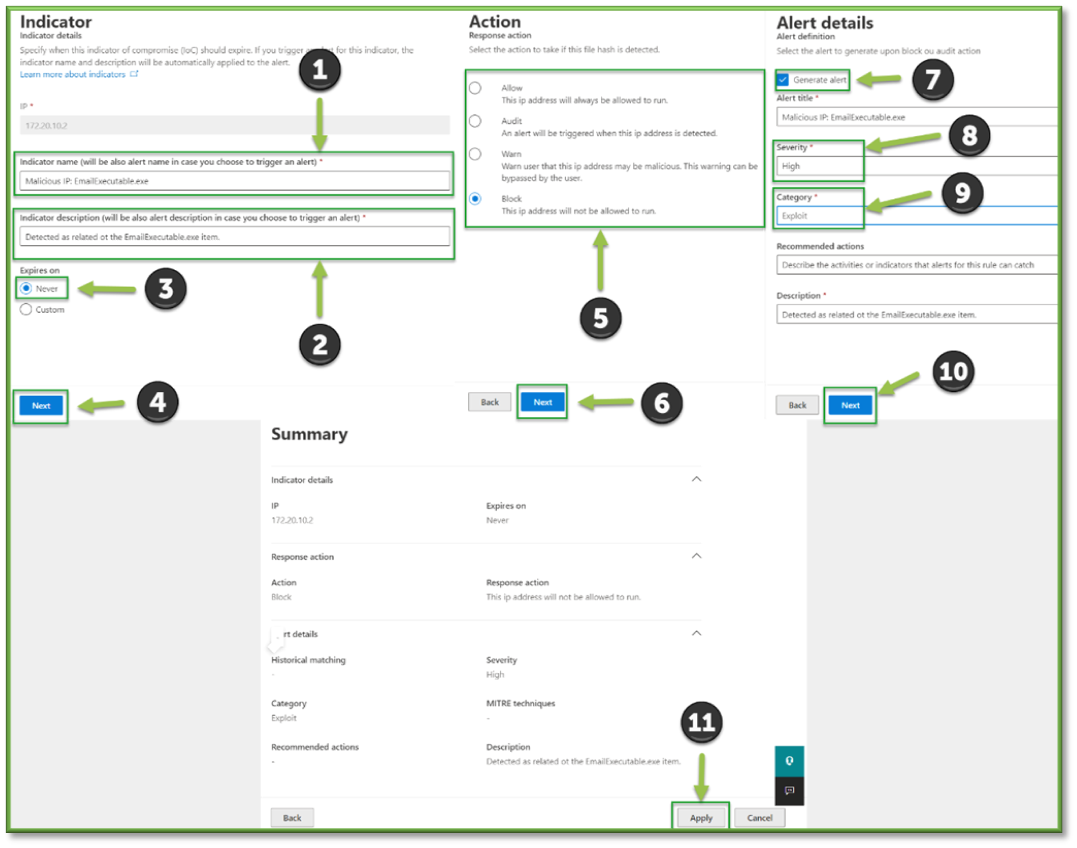
- Using the data provided, the analyst should be ready to make a decision on if the malware is of malicious intent or not. Click the Add Allowed/Blocked List Rule for This File button.
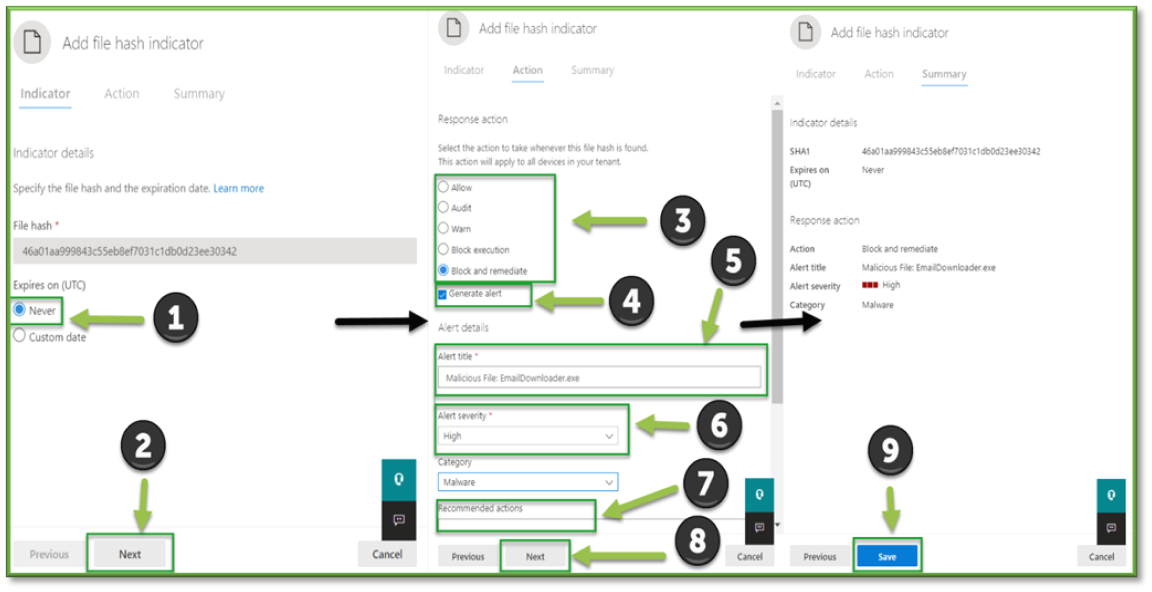
- On the first screen, click Never. Depending on the determination made on the file, the choices for response are as follows:
- Allow: Allows the file to run. If this incident looks to be legitimate behavior and the file is not malicious, this should be chosen.
- Audit: Allows the file to run but will fire an alert when doing so.
- Warn: Allows the file to run only if the user proceeds through a warning message.
- Block Execution: Blocks the file from running on all machines in the organization with Defender.
- Block and Remediate: Blocks the file from running on all machines in the organization with Defender, along with taking actions to subdue the threat through an automated Microsoft Response.
-
After picking the action to take, check whether to Generate Alert when the action is performed. Enter basic information such as the Alert Title, Alert Severity, and Description. Click Next, review the details on the next page, and click Save.
- If the incident was benign, skip to the Close an Incident section. If it was malicious, our last step will be to take further steps to block other indicators of compromise (IOC’s) from being allowed such as URLs or IP Addresses. Click into an associated evidence item, such as an IP Address or URL item, followed by Add Indicator.
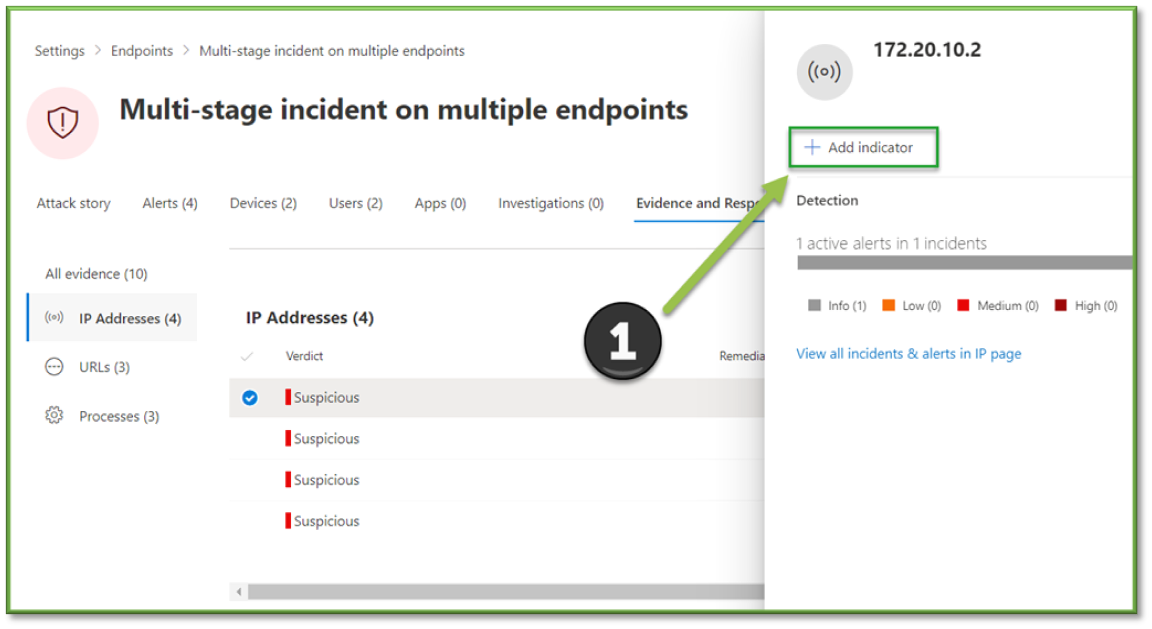
- Add the indicator following the steps below, inputting the Name, Description, Expiry, Action, Generate Alert, Severity, and Category. Upon adding the indicators of compromise, the response has been completed.
Note: Completion of the response procedure does not ensure the mitigation of an incident and serves purely for educational purposes.
Incident response is an art in itself and following a guide cannot guarantee that some items or correlations will not be overlooked.

Responding to Other Incidents
- Having opened an incident, details will be shown such as the affected device, user, and rundown of what happened. While the chosen response to threats can vary widely from team to team, the investigation following should be an adequate starting point. It is by no means a completely thorough investigation, and if it is suspected that the endpoint may be at serious risk, involving a team of trained incident response personnel such as those offered with the Sittadel MDR service may be the right choice.

- Start to gather key information about the who and what of the incident. Starting with who, find out the user and device that has been affected by locating the Devices and Users Take note of these, as they may provide vital context when making the determination of if the incident is malicious or not.

- Next, we need to find out what happened. To the left of the screen, find the Alerts that have been fired to determine if this is an email threat, endpoint threat, or other. Using the Incident Graph on the center screen, view the events that happened if applicable. Finally, check the Category of alert, followed by the Detection Source and Detection Status if available. If no detection source is shown, but the incident graph shows devices, it can be assumed the device was the point of detection.
- Move to the Evidence and Response tab. Within the tab, multiple evidence types may be present. These may be IP Addresses, URLs, Processes, Files, etc. Since this response could be any alert type, any item may be clicked.
- Within the item, there will be information about the event. Metrics will vary based on the type selected, but if there are URL’s or IP addresses involved in the threat, utilizing the URL Check Procedure may be an adequate way to assess the intent of the investigation items.

- Using the data provided, the analyst should be ready to make a decision on if the events are of malicious intent or not. If the incident was benign, skip to the Close an Incident section. If it was malicious, our last step will be to take further steps to block other indicators of compromise (IOC’s) from being allowed such as URLs and IP Addresses. Click into either an IP Address or URL item followed by Add Indicator.

- Add the indicator following the steps below, inputting the Name, Description, Expiry, Action, Generate Alert, Severity, and Category. Upon adding the indicators of compromise, the response has been completed. Move to the Resolve an Incident section.
Note: Completion of the response procedure does not ensure the mitigation of an incident, and serves purely for educational purposes.
Incident response is an art in itself and following a guide cannot guarantee that some items or correlations will not be overlooked.
Resolving an Incident
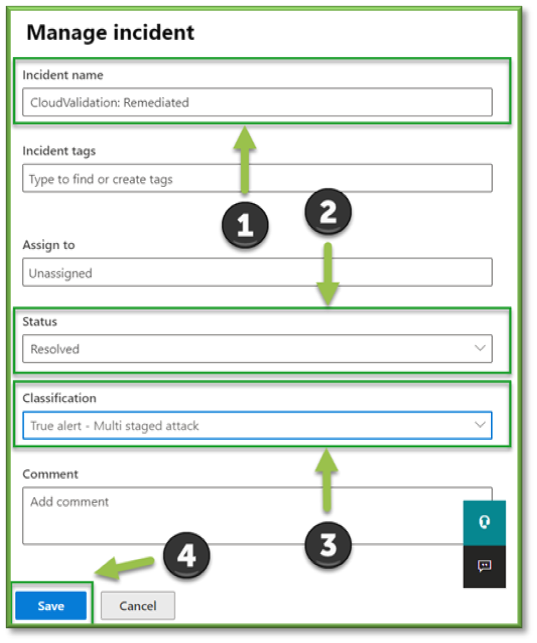
- The incident queue is based on Active (New), In Progress, and Resolved incident statuses. When an incident is resolved, marking it as such will remove it from the queue at the beginning of the procedure and allow new alerts to be easily identified. Open an incident and select Manage Incident at the top right.

- On the Manage Incident page, type the Name of the detection. It’s recommended to type a memorable identifier, followed by “Resolved”. Next, set the status to Resolved and decide the Classification. Classifications are as follows:
- True Positive: This would fit an incident in which actual malicious activity was identified and remediated.
- Informational, Expected Activity: Chose if the incident was useful to have from an informational standpoint, but no action was taken either way.
- False Positive: If the incident turned out to be expected behavior or not malicious, and actions were taken to allow the activity, chose this option.
-
Once all the fields have been filled in, select Save.
- Now, when the list is viewed it will be clear that this incident has been worked and no further actions needs to be taken.
You're Finished!
You should have successfully viewed the incidents section of the O365 Defender portal; if any suspicious events have been identified, additional inspection will need to be conducted to determine the severity level of the event. For any other problems or questions, reach out to us!