This user procedure will provide background information on different circumstances for the onboarding process for Windows Corporate or Personal Device in Intune.
This article is intended for employees of organizations that use Sittadel's security.
What is Onboarding?
When we refer to the term onboarding, what we really mean is joining the device to our tenant so that we can manage it. We need to be able to manage devices not to see user’s files, actions, or information, but to push down security policy to protect them. When a device is onboarded, it means we can manage the device in these ways along with disabling them or pushing actions to them.
Corporate vs Personal Devices
With so many people working from home, it is become commonplace for users to use whichever computer they like to access company resources. While certainly convenient, it is creating a huge problem for organizations that want to keep their data secure and devices managed. These devices may also be referred to as “BYOD”, or “Bring Your Own Device”. Bearing this in mind, if a computer wishes to access company resources as an internal user – whether the device is corporate owned or not – the device must be onboarded.
Personal Devices
Personal devices are seen as those devices which are not provided/owned by the organization. When a device is not owned by the organization, certain security policies will not be applied to allow the users to still retain ownership of their devices. However, this does not absolve them of the critical security policy that must be applied to all computers, whether personal or corporate. The organization will determine in which situations a user should be allowed to use a personal device, and access into the tenant may be removed at any time, along with de-joining the device from being managed by the organization. The organization and user may determine if wiping the device is appropriate to clear any lingering security policy or company data.
Corporate Devices
Corporate devices are seen as those devices which are provided/owned by the organization. These devices fall under the full control of the organization and are secured with methodology that reflects this. The same critical security policies are applied, along with additional security to help the organization protect its assets and data to a more comprehensive level. These devices will also call out to the organization when reset, and will prevent outside organizations from being signed in on them via Autopilot.
When a device is converted to a corporate device, if the account currently signed in is not that corporate account, then the new corporate account will need to be signed in to. This means a transfer of information from the current profile to the new one may be required, with the prepended OneDrive sign in steps helping to ensure the easy transfer of essential information contained in the Desktop, Documents, and Pictures folders. Most programs and applications should transfer with the switch. If a complete profile transfer must occur, such as windows settings or local bookmarks, we recommend getting in touch with the IT provider and determining if a tool such as User Profile Wizard would be appropriate.
What to do if you need Help
While we’ve tried to make this onboarding as simple as possible sometimes you might have a question, or you may encounter an error. When you were sent this document, you may have noticed the Security Essentials Enrollment Assistance document that was also included. When you run into any trouble with the enrollment process, you can use this document to get assistance and hopefully keep the onboarding going smoothly.
Onboarding Flowchart

Check if you are Already Onboarded
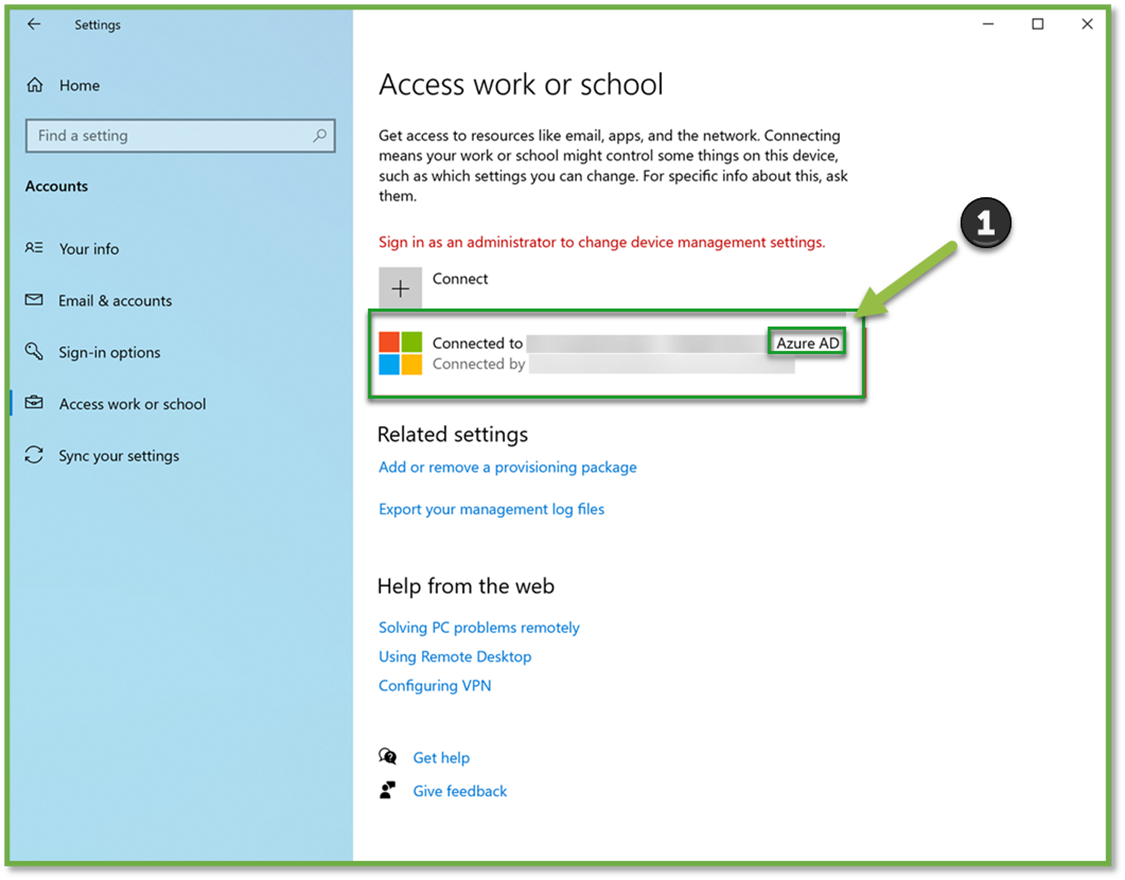
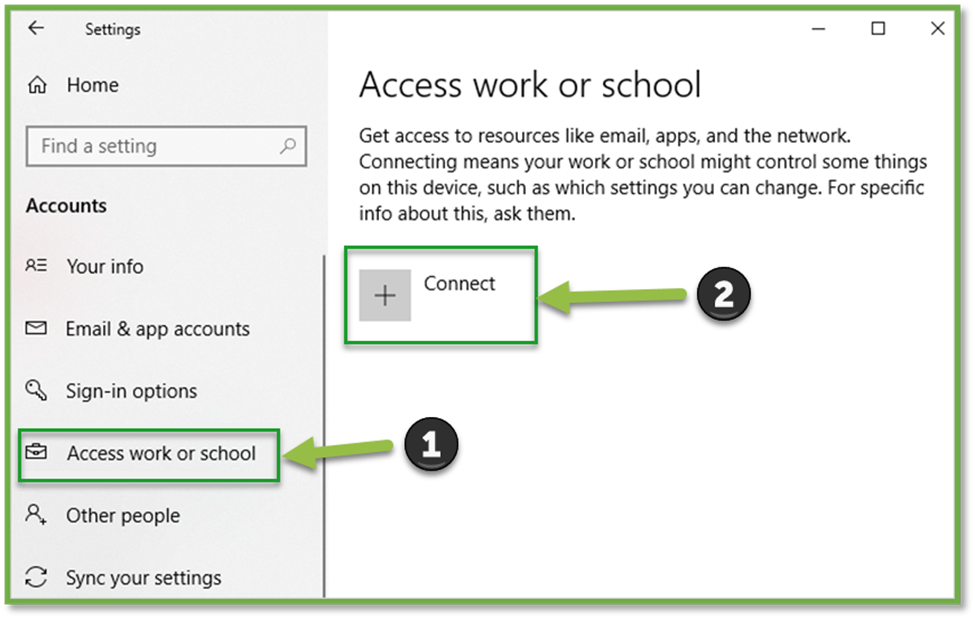
- Navigate to Settings | Accounts | Access Work or School.
- If the screen appears as below, with the verbiage of “Connected to XXXXX Azure AD” (Ensuring the specified domain is your domain), then the user has already signed in with the work account. There is no action required; they are already onboarded as a corporate device.
Onboard Using Autopilot (Pro)
- Step through the basic setup, such as connecting to Wi-Fi. From there, enter the organization username. From there, follow any prompts and the setup will complete automatically.

- Once the device is fully setup, check that the device is onboarded as a corporate device according to the steps in the “Identify a Corporate Device” section.
Onboard a New Device as Corporate (Pro)
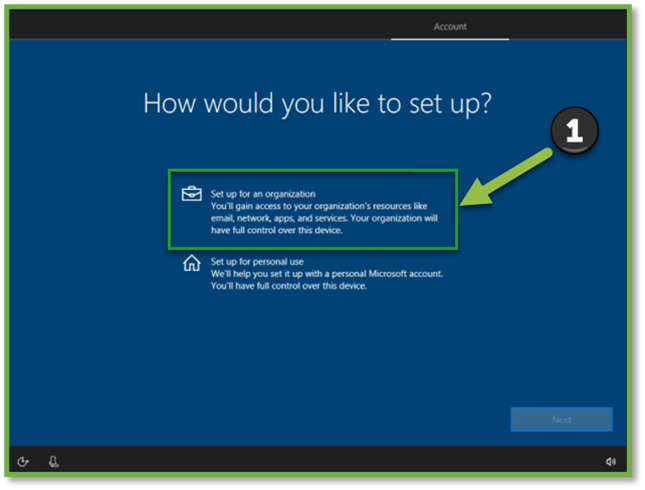
- With the un-setup device, proceed through basic setup until this screen is reached. (Note: In some cases, this will not show, and if it shows the step 2 screen before showing this screen, simply proceed to step 2.) Select the “Set up for an organization” option.
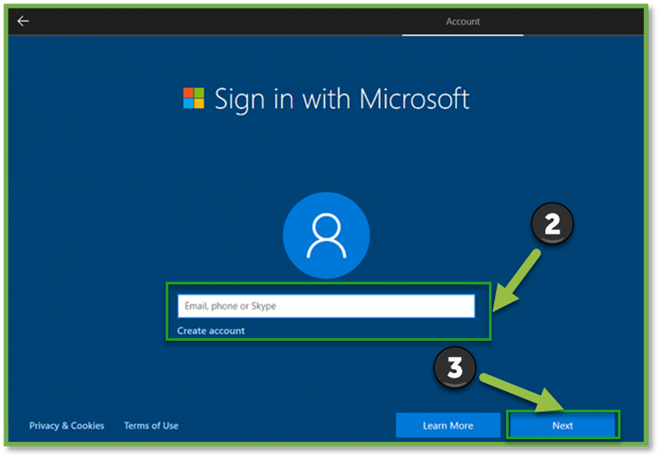
- From there, sign in with the organization email address and password as outlined below. All further setup will be completed automatically. [Note: if any errors occur at this step, retry at least 1 time before contacting support.]
- Once the device is fully setup, check that the device is onboarded as a corporate device according to the steps in the “Identify a Corporate Device” section.
Onboard an Existing Device as Corporate (Pro)
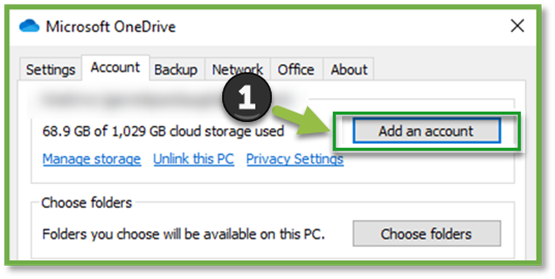
- Before continuing to add the corporate account, navigate to OneDrive in the task bar. If no icon exists, search for it in the Start menu or download and install it from here. If you already see a blue cloud, select it and ensure it is signed into your corporate account. If it is, proceed to step 8.

- Select the “Settings” option.

- Select the “Add Account” option. When prompted, input the username and password for the organizational account. Step through the rest of the steps by selecting “Next”.
- OneDrive will begin backing up the data within the Desktop, Documents, and Pictures folders from your computer. If there are any other files you would like to take with you to your corporate account, you can add them to a folder on your desktop. When the blue OneDrive cloud in the taskbar turns from a sync icon to solid color, you can proceed to step 5.

- Navigate to Settings | Accounts | Access Work or School.
- Reference the two figures below. If you find a “Work or School account” account connected, simply click “Disconnect” as an administrator and skip to step 12. If there is no account connected, also skip to step 12. If you find a “Connected to XXXXXX’s Azure AD” account, continue to step 7. [Note: Removing these accounts will remove it from any apps the account is signed in to. If you are unable to disconnect the account, it may be managed by another organization already or the IT department may need to be involved to help.]

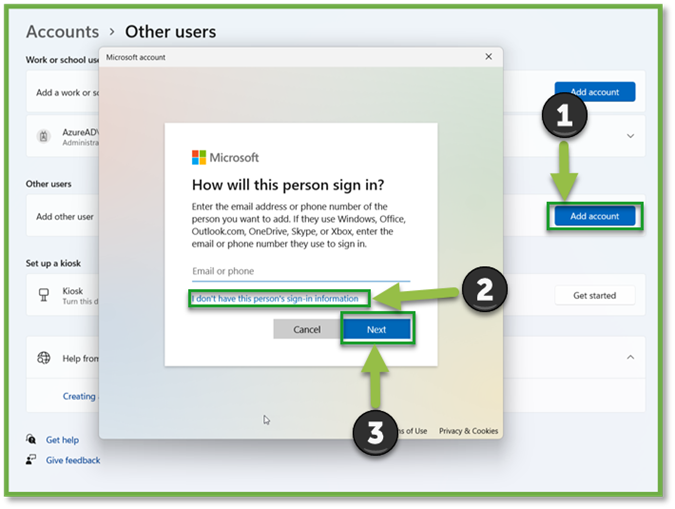
- Navigate to Accounts | Other Users. Select “Add Account”, followed by “I don’t have this person’s sign-in information”; select “Next”.
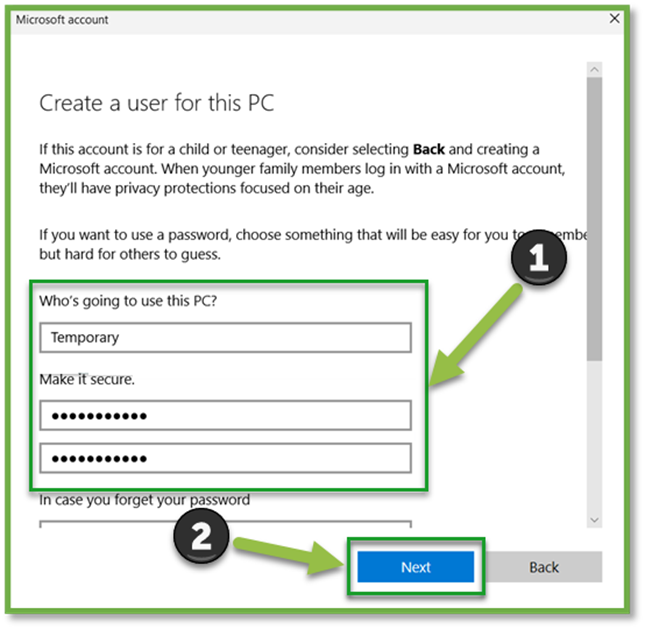
- Select the option to “Add a user without a Microsoft account”. Input a username of “Temporary” and create a password, along with security questions and answers. (Note: This account will only be used once.)
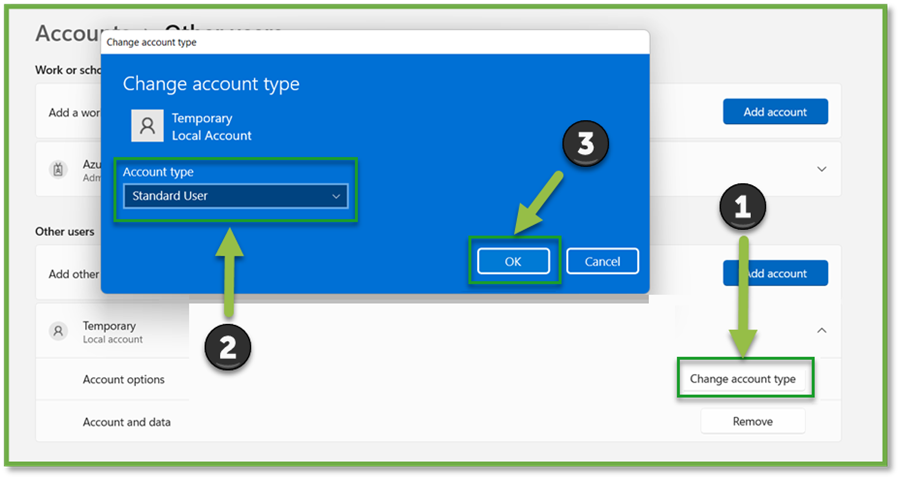
- Once created, navigate back to Accounts | Other Accounts and select the Temporary account you just created. Click “Change account type” and change it form a standard user to administrator user.
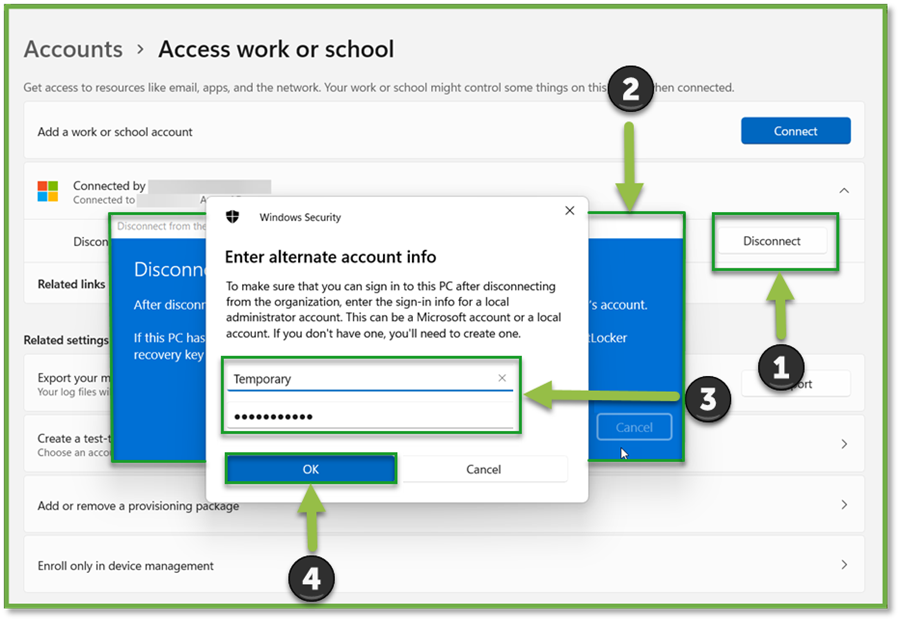
- Navigate back to Accounts | Access work or school. Select “Disconnect” on the account connected via Azure AD. Follow the prompts to continue to the disconnection, and input the temporary account credentials that was just created. In the “Email Address” field, put in Temporary and the password that was set. Select OK.
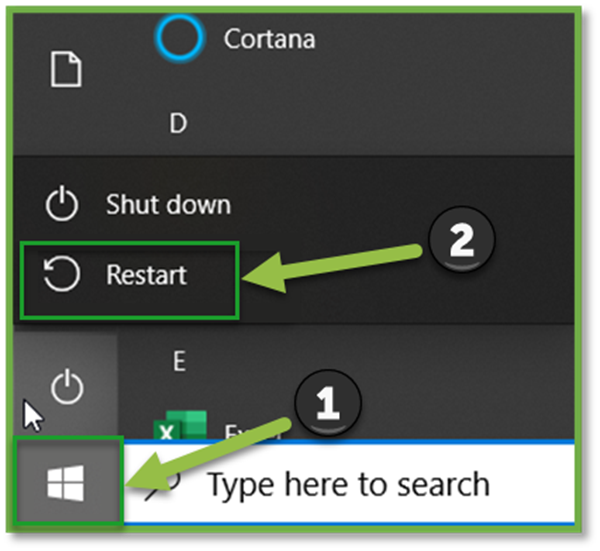
- A prompt will be displayed to restart the computer. Restart and log in as the Temporary account. (Note: It will look like your account is gone, but don’t worry; it still there, and will appear back soon.)

- Navigate to Accounts | Access work or school. There should be no accounts listed under the accounts page, select ‘Connect” to add your account.
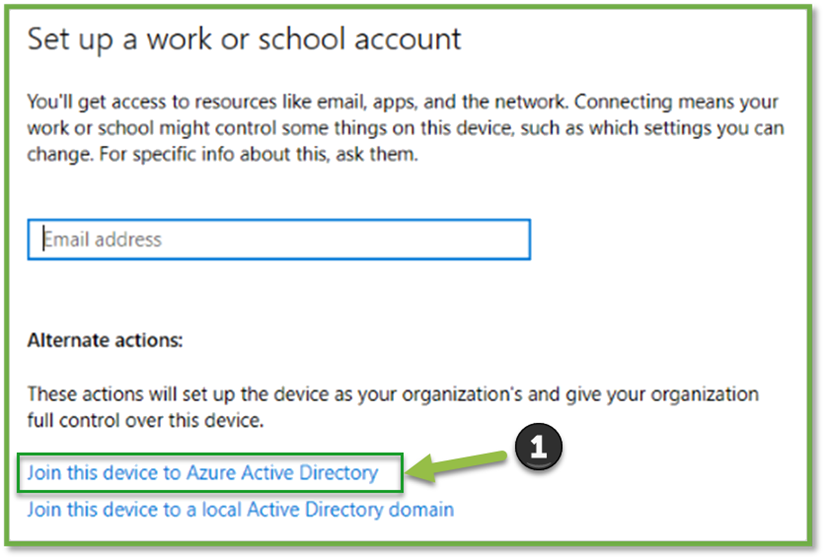
- When prompted, select the option to “Join this device to Azure Active Directory”. [Note: if there is not an option to perform this, ensure steps 5-7 were followed to completion, along with ensuring the account logged has administrative privileges.]
- Follow any prompts for joining the device. Once joined, restart the device.
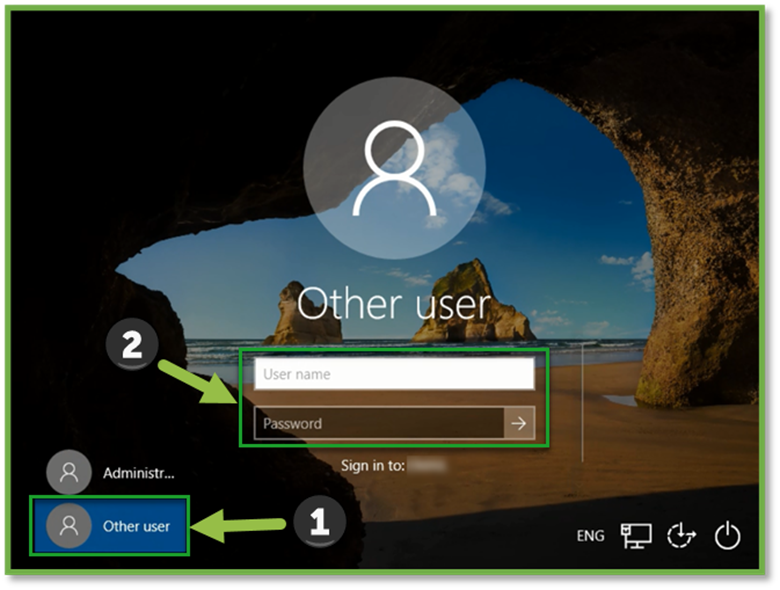
- From the sign in screen, select “Other User”, and input the organization username and password.
- Once the organization account has been successfully signed in to check that the device is onboarded as a corporate device according to the steps in the “Identify a Corporate Device” section. The data backed up from the previous account in OneDrive should start to populate.
Onboard an Existing Device as Personal (Home or Pro)
- Navigate to Settings | Accounts | Access Work or School.
- If the accounts page does not have any accounts linked with the “Connected to XXXXX Azure AD” verbiage, then select “Enroll only in device management.” [Note: In order to select this option, the user must be an administrator. If there is a separate administrator account on the computer, log in to it and perform this step.]

- Enter the credentials when prompted.
- When completed, this box will appear to confirm it is setting up the device; click “Got it”.
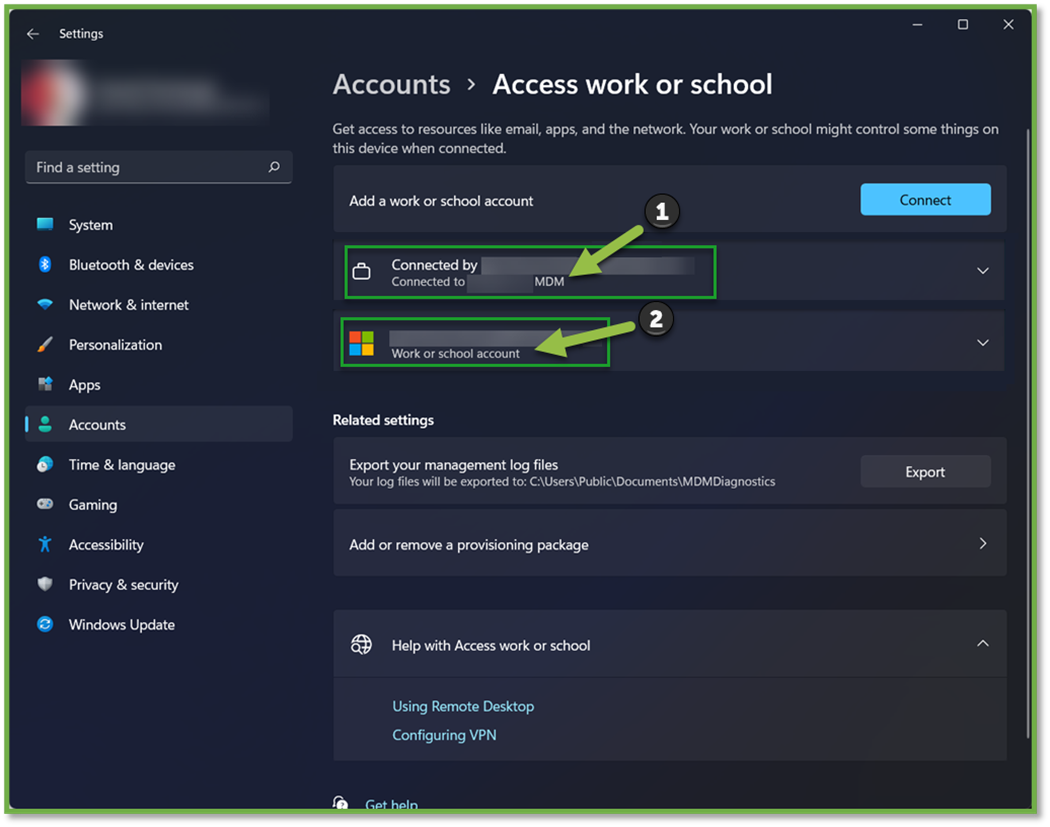
- Check to ensure that a page similar to below is shown. If there was already an account on the device, it will be displayed alongside the “Connect to XXXX MDM” account. The device is onboarded as a personal device.
You're Finished!
You should have successfully onboarded your Windows device as a personal or corporate device, this will allow you to get all of the security features and app deployment packages offered by your organization through the Intune management agent. For any other problems or questions, reach out to us!