.png?width=190&height=95&name=Sittadel%20Header%20Logo%20(2).png)
Gather macOS MDE Local Onboarding Package
- Prior to carrying out this procedure, we will need to verify that the specific macOS version that is currently being utilized meets the minimum system requirements specified by Microsoft, follow these steps here.
- Once the macOS Specification verification has been completed, navigate to the Endpoint Onboarding – Microsoft Defender portal, from this page specify the Operating System as macOS, Connectivity Type as Streamlined, and the Deployment Method as Local Script (for up to 10 devices).
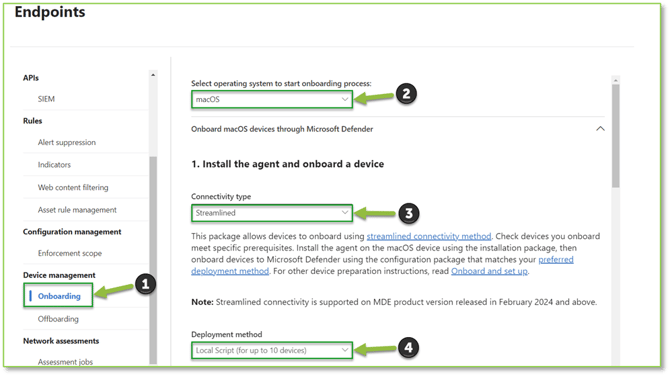
- Once the proper selections have been made, locate, and select Download Installation Package, the wdav.pkg file will be stored to the Downloads folder on the User account, we will also be selecting Download onboarding package, the GatewayWindowsDefenderATPOnboardingPackage.zip file will also be stored to the same directory.


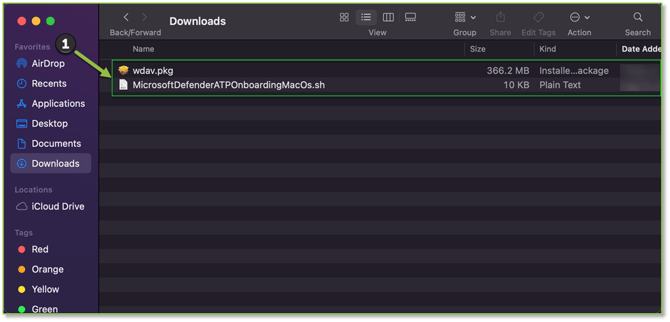
- We will need to extract the contents of the package, the extracted .zip folder should house a file named MicrosoftDefenderATPOnboardingMacOs.sh.

- After the extraction process has been completed, we will want to relocate the wdav.pkg file and the MicrosoftDefenderATPOnboardingMacOs.sh file to a location where they can be accessed by the desired macOS machines that are wishing to MDE join, this can be done by uploading these files to a trusted SharePoint, Outlook email, or USB.
Deploy macOS MDE Local Onboarding Package
- On the desired macOS Device, we will first want to verify that both the wdav.pkg file and the MicrosoftDefenderATPOnboardingMacOs.sh file are housed on a desired directory on the machine.
- Once we have verified that both files are present on the device, we will first access the wdav.pkg file from the directory the file is currently stored on. Once the wizard generates you will see the Introduction page select Continue to proceed.

- On the Licensing page, read through the Microsoft Application License Terms, select Continue to proceed.

- A popup will be displayed asking for consent for the licensure agreement prior to software installation. Select Agree to consent and continue.

- On the Installation Type page, verify that you have the proper disk space required for the software installation. Select Install to continue.

- You will be prompted to provide Administrative Credentials to install the software. Provide the necessary credentials and select Install Software to continue.

- After successful authentication, the installation process will be carried out, when complete you will receive a window to approve the system extensions used by the product. Select Open Security Preferences.

- To enable the System Extensions, select the Lock Icon, you will be prompted to provide administrative credentials to make system changes. Provide the necessary credentials to continue.


- Once unlocked, select Details to enable System Extensions.

- From the Security & Privacy window, select the checkboxes next to Microsoft Defender and select Ok.

- After the enablement of the System Extensions, you will be prompted to grant Microsoft Defender for Endpoint the ability to filter Network Traffic, select Allow to consent to the MDE agent inspecting socket traffic and reporting this information to the Defender portal.

- With the authenticated session to make system changes still active, we will proceed with allowing Accessibility for the Microsoft Defender app. Find the Microsoft Defender application from the list of allowed apps, verify that the checkbox next to the app is selected. If the Microsoft Defender app is not currently listed select the + icon to manually add the application through the generated Finder window. An example will be listed under step 17 and 18 of the procedure.

- Next, we will proceed with allowing Full Disk Access for the Microsoft Defender app and the Microsoft Defenders Endpoint Security Extension. Find the Microsoft Defender application from the list of allowed apps, verify that the checkbox next to the app is selected. If the Microsoft Defender app is not currently listed select the + icon to manually add the application through the generated Finder window. An example will be listed under step 17 and 18 of the procedure. Additionally, the Security Extension should be listed automatically after the explicit consent delegated in the previous steps.

- We will want to verify that after the Full Disk Access for the Microsoft Defender app and the Microsoft Defenders Endpoint Security Extension that they have been given access to all files and folders. This should be conducted automatically after the Full Disk Access has been granted.

- Lastly, we will proceed with allowing Bluetooth permissions for the Microsoft Defender app. Find the Microsoft Defender application from the list of allowed apps, verify that the checkbox next to the app is selected. If the Microsoft Defender app is not currently listed select the + icon to manually add the application through the generated Finder window. An example will be listed under step 17 and 18 of the procedure.

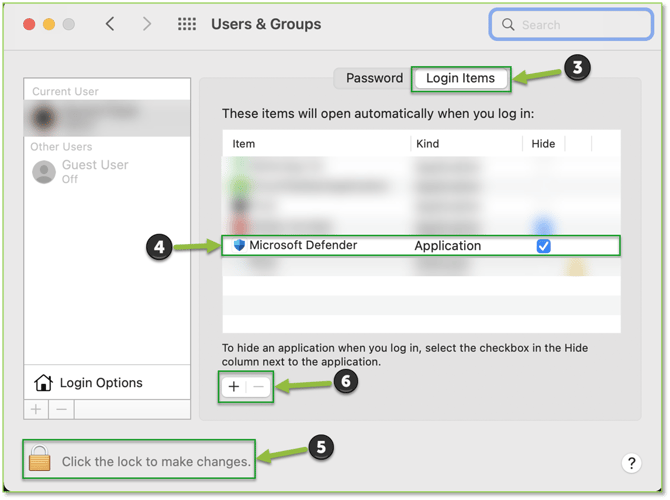
- After the necessary security controls have been enabled within the Security & Privacy section of the System Preferences utility will need to enable the Microsoft Defender app to be an allowed Background Service. This can be achieved by selecting the Spotlight Search utility and supplying Login items or Signin items. Locate and select the Users & Groups system settings option.

- This will open the current User Accounts and Groups that are associated with the device, with the desired Current User selected, we will want to move from the Password settings to the Login Items settings, this can be done by selecting the Login Items tab. Once selected we will want to verify if the Microsoft Defender application is listed, if it is we can exit from this window, if it is not, we will need to select the Lock Icon, you will be prompted to provide administrative credentials to make system changes. Provide the necessary credentials to continue. Once authenticated we will select the + icon to add the necessary application.
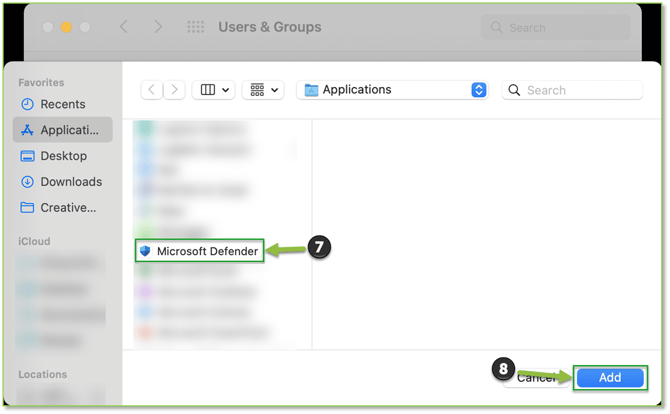
- When selected a Finder session will be opened, the Applications section should already be selected, using the Search Bar, or manually scrolling, locate and select the Microsoft Defender application from the list. Once selected, hit Add to confirm the service allowance. If correctly done the Microsoft Defender application should now be listed as an automatic Login Item.
- Before finalizing the security settings for the MDE agent, we will need to deploy the MicrosoftDefenderATPOnboardingMacOs.sh onboarding script to register the agent to the desired tenant and license it. We will begin by executing the command below to verify that the macOS device is currently not onboarded through Intune or already locally onboarded for MDE.
Command
mdatp health --field org_id

- After the execution of the command above, the code should return the value No license found, if it does not then your device has been connected through Intune or has already been joined locally to the Microsoft Defender portal.
- After the verification command has been executed, we will proceed with leveraging the MicrosoftDefenderATPOnboardingMacOs.sh script, this can be done by relocating to the directory that the .sh file is housed in, once inside the directory execute the command below. You will be prompted to supply the administrative password associated with the account.
Command
sudo bash -x MicrosoftDefenderATPOnboardingMacOs.sh

- After the execution of the command, you will see the return values of a .plist file and additional directory configuration being established, this ensures that the necessary security controls are in place for device communication with the Microsoft Defender portal being established.
- We will want to re-execute the mdatp health --field org_id to verify that the execution of the MicrosoftDefenderATPOnboardingMacOs.sh script has successfully connected the machine to the desired tenant.

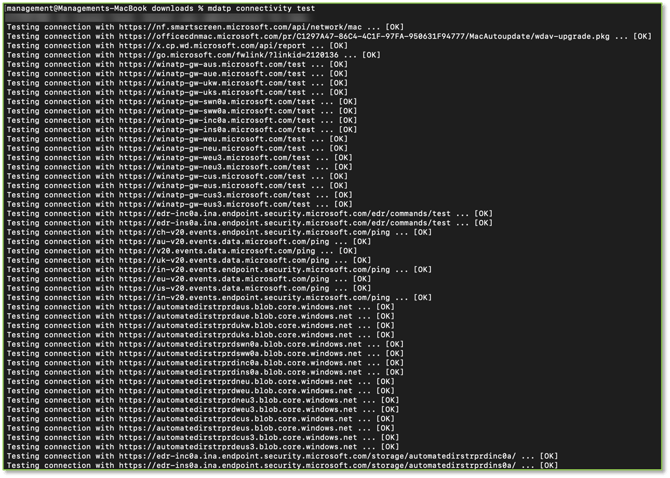
- After the tenant connection has been verified, we will want to leverage a connectivity test that will verify that all connection established by Microsoft services are executing properly, leverage the command below.
Command
mdatp connectivity test
- Now that we have established the necessary licensure requirements for the MDE agent, we will now want to finalize the security settings for the MDE agent, we can achieve this by executing the one-liner below to enable necessary security settings like Tamper protection, PUA blocking, etc. You will be prompted to supply the administrative password associated with the account.
One-Liner
mdatp threat policy set --type potentially_unwanted_application --action block; mdatp config network-protection enforcement-level --value block; sudo mdatp config tamper-protection enforcement-level --value block

- After the execution of the one-liner, you will see the return values of successful configuration of the listed item. This finalizes the deployment of the local MDE agent on macOS, we will now move onto Assessing the MDE agent on the device.
Assessing a macOS MDE Local Onboarding Deployment
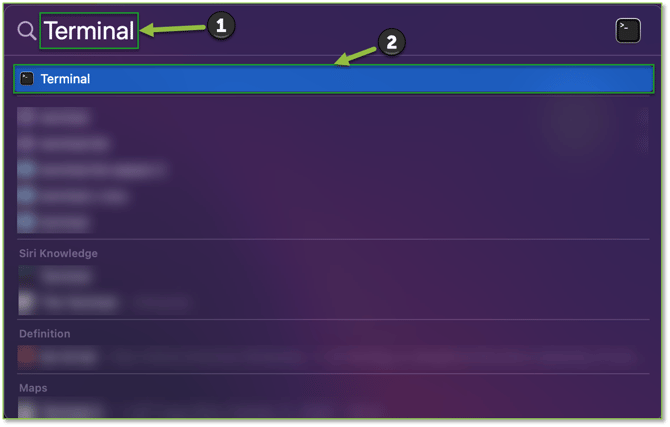
- Utilizing the macOS Spotlight Search functionality, provide Terminal within the search field. Locate and select the utility to begin.
- Once the session is initiated, supply the following command to evaluate if real-time protection is currently active on the machine for the Microsoft Defender This should return true, if not you will need to verify that the settings within the application are configured properly.
Command
mdatp health --field real_time_protection_enabled

- Once the session is initiated, supply the following command to evaluate the connectivity with the MDE agent and Microsoft Defender Servers.
Command
curl -o ~/Downloads/eicar.com.txt https://www.eicar.org/download/eicar.com.txt

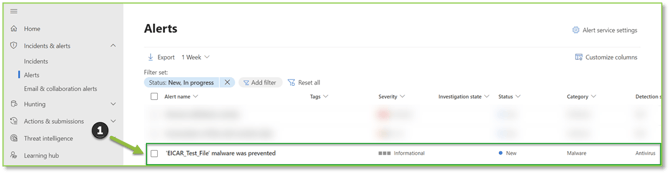
- If done correctly, within a few moments an ‘EICAR_Test_File’ malware was prevented alert will be generated within the Alerts – Microsoft Defender portal.
Need Assistance?
Reach out to your Customer Success Manager to discuss how a Sittadel cybersecurity analyst can assist in managing these tasks for you. New to our services? Inquire about arranging a consultation to explore optimizing your Azure environment for painless management.